CloudShare supports editing your virtual machine hardware and increasing the disk, RAM, or number of CPUs. To access this functionality, bring up your environment and navigate to the Edit Hardware page:
Once you are in the Edit Hardware page, you can edit the available resources. Click on the Disk edit icon, and then use the slider to reallocate more drive space. Use this cautiously and do this in small increments when you need the space - as you cannot shrink the volume once the changes are saved:
Click Save Changes and your environment will begin updating.
Note:
If you edit your disk size, you will have to partition your hard drive accordingly.
Extending Partition Size in Windows
Access the Disk Management utility, either by searching for it in Windows search or running the following from 'Run' or CMD: diskmgmt.msc.
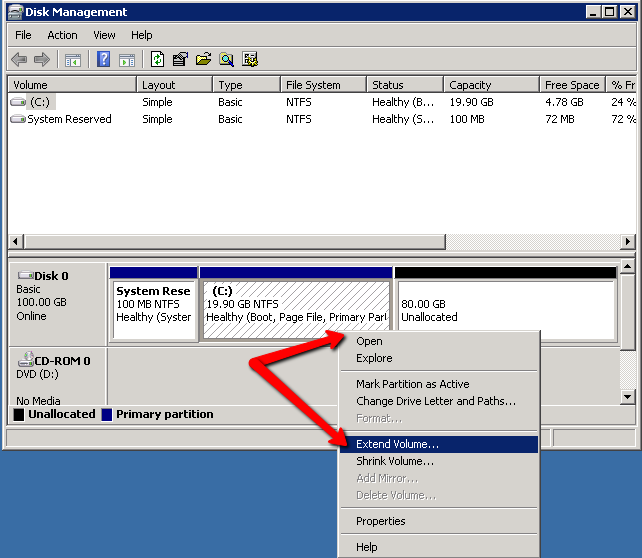
Once there, right-click on the main partition and select Extend volume…
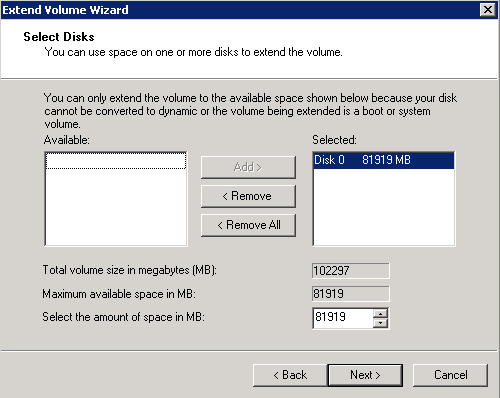
Select the size you want to allocate, and click Next:
Finish the process and you will see the extra space assigned to your main partition.

Finally, take a snapshot to your CloudShare environment to ensure that your new settings are saved.
Extending a Linux Disk
After increasing the disk size in CloudShare’s Edit Hardware page, you will also need to increase the disk size inside the operating system.
The following details how to extend a hardware drive in Linux.
Step 1: Get the partition table type.
- Retrieve the disks information:
sudo fdisk -l
- Search for Disklabel type under the disk that you want to increase.
- The disk name should be /dev/sda by default. You will either see ‘gpt’ or ‘dos’. For ‘gpt’ we will use the gdisk command, and for ‘dos’ we will use the fdisk command.
Step 2: Create a new disk partition for LVM.
For the ‘gpt’ partition table type, open the gdisk menu that allows you to change the disk partitions:
sudo gdisk /dev/sda
Follow this gdisk command sequence:
p (to view the current partition layout)
n (new partition)
Enter (to let it automatically choose the partition number. Take note of this number)
Enter (to let it automatically choose the first sector)
Enter (to let it automatically choose the last sector)
8E00 (the type code for the 'Linux LVM’)
p (to see the new partition. Verify that it has the correct size.)
w (to write the changes to the disk)
Y (to confirm)
For the ‘dos’ partition table type, open the fdisk menu that allows you to change the disk partitions:
sudo fdisk /dev/sda
Follow this fdisk command sequence:
p (to see the current partition layout)
n (new partition)
p (primary)
Enter (to let it automatically choose the partition number. Take note of this number)
Enter (to let it automatically choose the first sector)
Enter (to let it automatically choose the last sector)
p (to see the new partition. Verify that it has the correct size.)
t (to change the partition type)
Enter the partition number we just created.
8e (the code for the 'Linux LVM' type)
w (to write the changes to the disk).
Step 3: Increase the root partition with the new disk partition.
Inform the OS of the partition table changes:
sudo partprobe
Create the physical volume for the new partition we created. Replace X with the partition number you took note of previously:
sudo pvcreate /dev/sdaX
Take note of the Volume Group name:
sudo vgdisplay
Extend the Volume Group with the Physical Volume we created. Replace vg_name and X:
sudo vgextend <vg_name> /dev/sdaX
Take note of the Logical Volume path you want to extend (note that there is usually more than one):
sudo lvdisplay
Extend the Logical Volume with all of the free space that the Volume Group has (replace lv_path):
sudo lvextend <lv_path> -l +100%FREE
Get the file system type (look at the type column for the Logical Volume you extended):
df -T
For ext4:
Use the resize2fs command:
sudo resize2fs <lv_path>
For XFS:
Use the xfs_growfs command:
sudo xfs_growfs <lv_path>
Step 4: Verification
Run the df command to verify that the partition was extended successfully:
df -h
Tips:
1. Some commands support the Linux autocomplete feature. When you run them as the root user, you will be able to press the Tab key to autocomplete the parameters. For example, start typing 'vgextend' and then press the Tab key. This will autocomplete the VG name for you.
2. If you want to increase the Logical Volume by a certain size, and not by ‘100% free’ you can use the following syntax (Note the capital L):
sudo lvextend <lv_path> -L +10GB