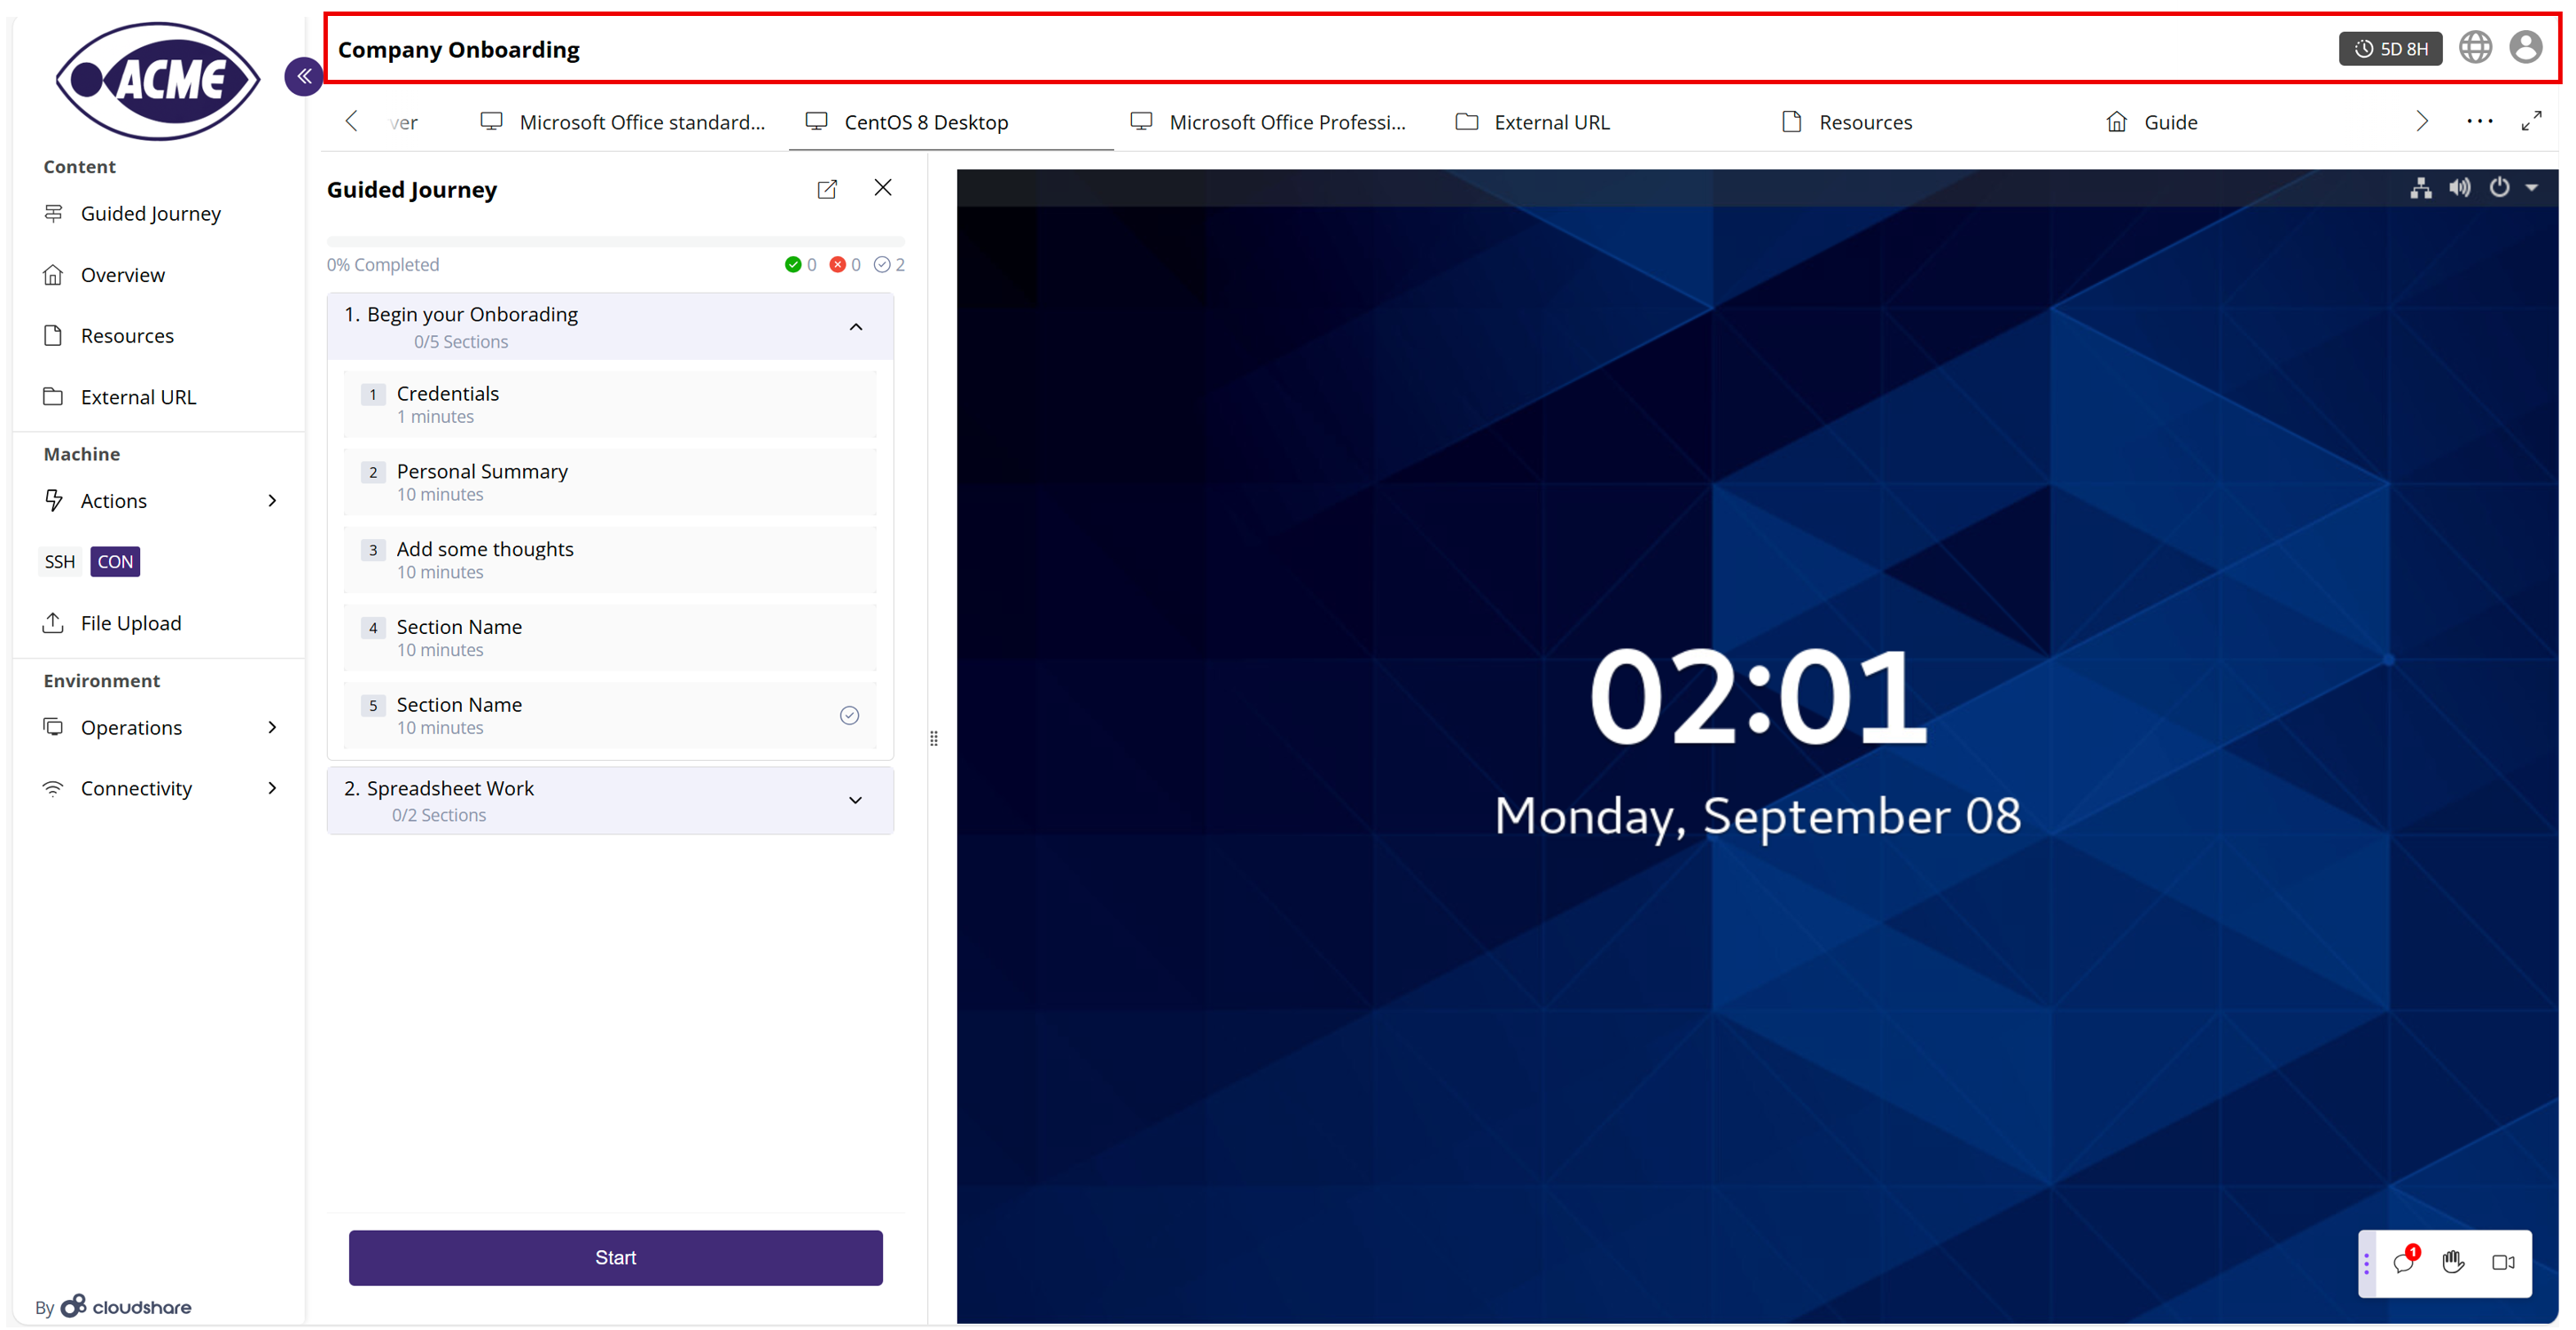
Header
 Logo
Logo
The logo in the top-left corner typically represents the experience or organization hosting the experience, as defined by the instructor in the Editor.
Experience Name
The experience name appears in the top center of the Participants Viewer, as defined by the instructor in the Editor.
Remaining Runtime
The remaining time (in days and hours) until the experience is suspended is displayed at the top right.
Hovering over this widget also displays the number of days, hours, and minutes after which this environment will be deleted.
Changing Languages
Hovering over this icon lets a participant select the language of the Participants Viewer’s user interface features. It does not affect the Content items and VM interface added by an instructor in the Experience Editor.
User Profile
Clicking the user icon opens the User Profile menu, in which a participant can view their account details, access their account settings, or log out of the experience.
Full Screen
Clicking the Full Screen icon displays the active VM or Content page in full screen. This view provides all the same options as the Participants Viewer’s VM View. See Full Screen for more information. To exit this view, press Esc or click Exit from the popup menu.
Side Menu
A pane of Participant Viewer menu options appears on the left side, allowing participants to display content, perform keyboard and display actions on virtual machines, carry out environment operations, test connectivity, and upload files. See Side Menu for more information.
Here's an example of side menu options:
The following sections describe all the options that may appear.
Expanding and Collapsing the Side Menu
At the top of the left panel, an icon enables the expansion and collapse of the Side Menu.
- Click
to expand the side menu. The panel shows both icons and labels for each content item or feature.
- Click
to expand the side menu. Only the icons are visible, giving more space in the main Participants Viewer area.
The picture above shows how the side menu appears when it is expanded. The following shows what it looks like when it is collapsed:
Note: A VM cannot be displayed from the left menu. It can only appear among the top tabs.Machine Actions
The following describes the actions provided for a participant.
Keyboard
These keyboard settings in the Participants Viewer vary, depending on the VM type (such as Linux or Windows) that is currently active. Options also vary when RDP10 is used.
- VM Clipboard (Windows & Linux OS only): Enables the transfer of clipboard text between the local computer and a VM.
- Send Username: Transmits the current username for the active VM as plain text.
- Send Password: Transmits the current password for the active VM as plain text.
- Send Ctrl-Alt-Del: Simulates pressing (sending) the Ctrl-Alt-Del key combination to the active VM, which will reboot it.
- Send Ctrl-W: Simulates sending the Ctrl-W key combination to the active VM.
- Send Windows Key (Windows OS only): Simulates pressing (sending) the Windows key on the active VM to invoke a Windows-related or other special function.
- Keyboard Language: Displays a dropdown list that enables the selection of the language used by the keyboard and transmitted to the active VM.
- Back, Forward, Home (SaaS Template only): Sends the associated page command to the active VM or Content page.
- Send Text (Non-Windows OS, Console connection): Enables the transfer of a buffer of text between the local computer and a VM.
- Control-V Function: (Console connection) Enables Control-V or Command-V functionality to be configured for a VM.
Display
The Display option provides access to the following Participants Viewer display settings:
- Resolution (Windows OS only): Enables the selection of the display resolution used for the selected VM or Content page from a dropdown list. The resolutions shown will depend on the characteristics of the VM or Content page.
- Color Depth: Enables the selection of the display’s color depth of 8, 16, or 32 bits for the selected VM or Content page.
- Sound Configuration: Provides a popup menu that allows the audio functionality for the active resource to be enabled/disabled. When available, a High Quality option is displayed, providing an audio sampling frequency and/or bit depth that exceeds 44.1 kHz/16-bit.
-
Full Screen: Displays the active VM or Content page in a full screen. This view provides all the same options as the Participants Viewer’s VM View. See Full Screen for more information.
To exit this view, press Esc or click Exit from the popup menu.
While using the Participants Viewer, participants can make various settings and adjustments, transfer text, get credentials, upload files, and more.
Connection Type
The Machine area in the side menu enables the selection of the connection method for the virtual machine currently selected in the top tabs (for example, Windows 11 Pro). The system enables connection to a VM using various protocols, such as RDP, RDP 10 (browser-based), SSH, VNC, or CON (web console).
File Upload
CloudShare’s File Upload feature enables the uploading of files to a virtual machine in the Participants Viewer’s environment (including batch, integration, data, configuration, or executable files). These files can be used to set up the experience (such as by installing applications) and/or during the experience.
Note: Files are uploaded per VM and per experience.- Click File Upload in the left panel. A file selection popup is displayed.
- Select the files to upload or drag-and-drop files into the popup.
After a successful file upload, a green checkmark is displayed next to the uploaded file.
If an upload error occurs, a red notification appears.
Files are automatically saved in the Uploads folder which can be accessed by clicking the Where are my files? option. The exact location of the Uploads folder is determined by the machine's VM’s operating system.
- For Windows: C:\Uploads
- For Linux: The admin home folder.
The system selects the first admin user of the VM according to alphabetical order and saves the files in that user's home folder.
Important information:
- If the File Upload section is disabled in the side menu, check whether VMWare tools have been installed and are running on the virtual machine. For Windows-based VMs, PowerShell Version 2.0 or higher is required.
- In the network configuration for the Experience’s Environment, ensure that the Allow Outgoing checkbox is activated to enable file uploads to succeed. (Typically, this option is activated by default.)
Uploaded File Requirements
Uploaded files must meet the following requirements:
- Uploaded files cannot exceed 512 MB in size.
- Filenames can only contain the following characters: a-z, 0-9, ‘-‘, ‘_’, ‘.’, and spaces.
- If two files are uploaded with the same name on the same machine, the first file to download to the machine will be overwritten (if two upload requests occur simultaneously, the second one may also be overwritten).
If the file upload fails for a particular VM, access the Environment Details page and click the Resolve (Recommended) link.
Uploading to Legacy Operating Systems
The following are additional steps that may be required when uploading files to an older operating system.
Windows Server 2008
Download and install the following items on the VM:
- .NET Framework for Windows
- Windows Management Framework (WMF)
- PowerShell Version 7.2
Environment and Connectivity
The system provides access to environment Operations and Connectivity functions, which are available according to the logged-in user’s permissions, including:
Operations
The following describes the operations that a participant can perform in an experience, depending on the experience's current state.
- Refresh Networking: Reconfigures the networking for the environment. During this process, all VMs will become temporarily inaccessible for several seconds. Your current session may be lost when this operation is performed.
- Revert Environment: Returns the Experience to its original state. This effectively restarts the entire experience, removing all work performed in the environment. If the environment has external cloud VM or Content pages configured, these will also be reverted.
- Suspend: Stops any activity, stores the environment in its current state, and shuts down all of its resources.
-
Open Full Screen: Displays the active VM or Content page in a full screen. This view provides all the same options as the Participants Viewer’s VM View. See Full Screen for more information.
To exit this view, press Esc or click Exit from the popup menu.
Instructors also have access to the following options:
- Show/Hide Cloud Folder: Accesses the cloud folders if available on a VM in the environment.
- Delete: Deletes the currently selected VM.
- Extend: Enables the lengthening of the runtime and storage duration of their environment, giving them greater control over VM or Content page usage during an experience. See Extending a Participant’s Environment for more information.
Extending a Participant’s Environment
This feature enables you to extend your environments. It provides you with additional ways to manage your resource consumption and extend the use of the environment.
This option is only available for instructors.
Note: Each Experience is created and can be modified in the Editor before it becomes active.Note: Whether or not a Participant has permission to extend their Environment depends on the project. Not all Participants will have permission to extend.To get started:
- Under Environment, select Operations, and then select Extend to extend the selected Environment(s).
Note: By default, the Storage Lease and Runtime Lease options are pre-populated with the selected policy’s Runtime and Storage Lease values. The runtime cannot be longer than the storage time. - Enter the requested lease times.
- Click Extend.
This action can be repeated as many times as needed.
Connectivity
The Connectivity menu provides access to the following Participants Viewer connection settings and functions:
Reconnect
This feature issues a reconnect command to the active VM.
Note: Clicking on the desired connection type also reconnects to the active VM. Connectivity Test
In most cases, connectivity will be fast and seamless when using any modern web browser.
To ensure that their CloudShare Experience is productive and enjoyable, we recommend that each participant test their connection to the CloudShare platform in the Participants Viewer before the experience starts.
During a CloudShare Experience, each participant can select Connectivity and then Connectivity Test to test their connection directly from inside the Participants Viewer.
This feature runs a standard WebSocket and speed test for the active environment.
If participants are experiencing difficulty connecting to a resource or the connection is running slowly, this function can provide relevant information from inside the Participants Viewer.
Connection Details
This feature displays key information about the connection to the current VM, including login credentials, IP address, and allocated resources. Whenever needed, the system enables this information to be copied for use elsewhere. The available Connectivity options vary according to the OS being used by the VM.
Download RDP
For (Windows OS only, Public IP only)
This feature downloads a Windows Remote Desktop Protocol (RDP) file for the active VM to the local machine.